Home
This tutorial shows how to make custom FTC Blocks, to be used in regular Blocks programs. These "myBlocks" are programmed in Java, with OnBotJava or Android Studio.

sample myBlock: operate a servo, no value returned
A myBlock can add advanced capability previously available only to teams using all-Java code. Or, a single myBlock can serve as a 'super-Function', containing robot instructions that previously needed many regular Blocks. Now your team's Blocks code can be more powerful, and simpler!

sample myBlock: return encoder target value based on inputs
Also, myBlocks programming allows some team members to begin learning and using Java, contributing valuable new features. The other team members can continue learning and working in Blocks, producing the team's official code. Nobody is held back, or left behind.
Hats off to Google engineer Liz Looney for this major development!
- This tutorial builds myBlocks with OnBotJava, a programming tool running on the RC phone or Control Hub. Any student already using Android Studio can easily follow the same programming.
- This tutorial does not teach Java or OnBotJava (OBJ), beyond the bare minimum needed for basic myBlocks.
Start with a simple myBlock that creates a greeting "Hello World" (of course!).
Open a Chrome browser connected via Wi-Fi to a Robot Controller (RC) phone or Control Hub. Go to the address http://192.168.49.1:8080 (RC) or http://192.168.43.1:8080 (CH), and click the OnBotJava tab.
Note: a computer can usually connect to only one Wi-Fi network at a time. To follow this tutorial while programming, first allow this single web page to load completely, then connect to the RC phone or Control Hub. If you need internet and FTC programming together, connect an Ethernet cable to an internet router. Some computers can do this with an added USB Wi-Fi dongle.
Click the large plus-sign icon to open a new file; call it SampleMyBlocks.java. Use the default 'teamcode' folder location. Don't choose a Sample OpMode, and use the default setting 'Not an OpMode'. Click OK.

In the work area you see a simple/empty Java program.
![]()
Line 1 shows the default storage folder 'teamcode', and Line 4 shows the class name, same as the filename. It's public so other classes can access it. Notice the left curly brace at Line 4 and right curly brace at Line 7. Place all your code between these curly braces.
The two forward-slash marks // indicate a comment line, all ignored by the Java software. Good programmers use lots of comments, to communicate with your FTC teammates and with your future self! You will not remember every little detail of your programs... and will thank yourself later for commenting heavily!
Programming note: A class describes methods (actions) and fields (properties) that can be used by objects (examples or instances of the class). A class called 'dogs' might contain methods 'run' and 'sleep', and fields 'friendliness' and 'appetite'. Your pets Spot and Rover would be objects or instances of the 'dogs' class.
After the class name, type extends BlocksOpModeCompanion. This declares your new class as a subclass or child of a higher superclass or parent. The parent class BlocksOpModeCompanion contains useful tools to be inherited by your new subclass.
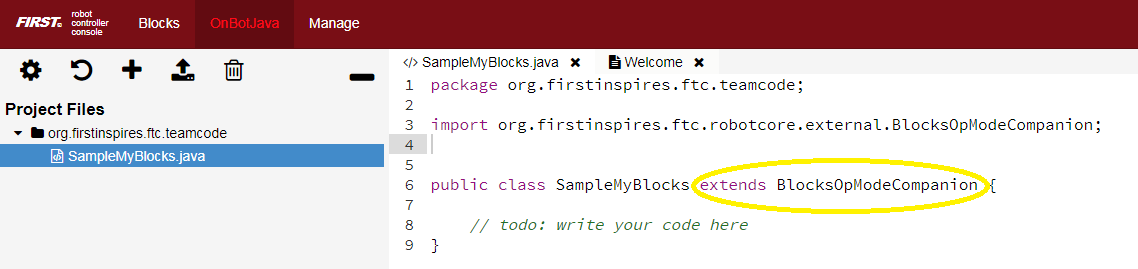
When you enter that line, the OBJ software automatically creates an import statement, making the parent class available. Convenient!
Programming note: classes inherited from BlocksOpModeCompanion include OpMode, LinearOpMode, Telemetry, HardwareMap, and Gamepad. All very useful! Your myBlock method can directly use objects or instances of these classes without declaring them. Examples follow below.
Inside the curly braces, type new lines as follows:
@ExportToBlocks (
       comment = "Here is a greeting for you.",
       tooltip = "Greet a person or group.",
       parameterLabels = {"Recipient"}
)
These are optional labels to appear on your new myBlock; you'll see below. Even if you don't want to use any of these features, you still need the annotation line @ExportToBlocks.
When you typed that annotation, OBJ automatically added the import statement.
Now you're ready to create the method, namely your first myBlock. Type the following lines:
public static String myGreeting (String greetingRecipient)  {
       return ("Hello " + greetingRecipient + "!");
}
The method's name is myGreeting. It is a public method, so it can be used or called from other classes. And it's a static method, required for all myBlock methods.
The first usage of the word String indicates the method gives or returns one output of type String or text. The second usage is inside the parentheses, indicating the method takes one input named greetingRecipient, also of type String.
Programming note: the method's name and list of parameters (inside the parentheses) is together called the method signature.
The method contains only one line of instruction: three text items are joined to form a single text string. The middle text item is the input parameter greetingRecipient, to be entered by the Blocks user. The longer combined string is returned to the program that called this method. Namely, the combined string is provided to the Block that uses your new myBlock.
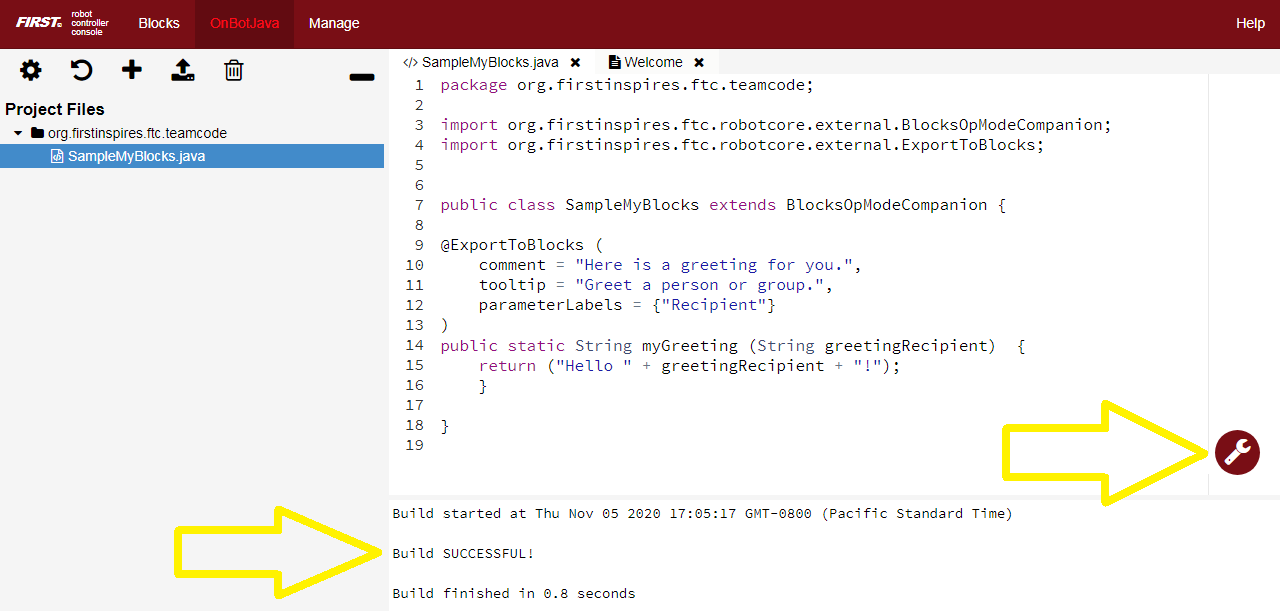
That's it for the Java! Click the wrench icon to Build Everything including your new class. If there are error messages, read carefully and fix any mistakes. When you see "Build Successful!", your new myBlock is ready to use.
Note: this tutorial intends for you to manually type the Java code above. OnBotJava helps by suggesting some commands as you type, and entering import statements when classes are used. Android Studio helps even more. If you require pre-typed text of this example, click here.
In the browser still connected to the RC phone or Control Hub,
- click the Blocks tab
- click Create New OpMode, name it Test_myBlocks_v01
- use the default Sample, called BasicOpMode
- click OK
![]()
You will now see a new menu choice at the bottom, called Java Classes. Open that, to see the class you created, called SampleMyBlocks. Click that, and drag your new myBlock out to the work area.
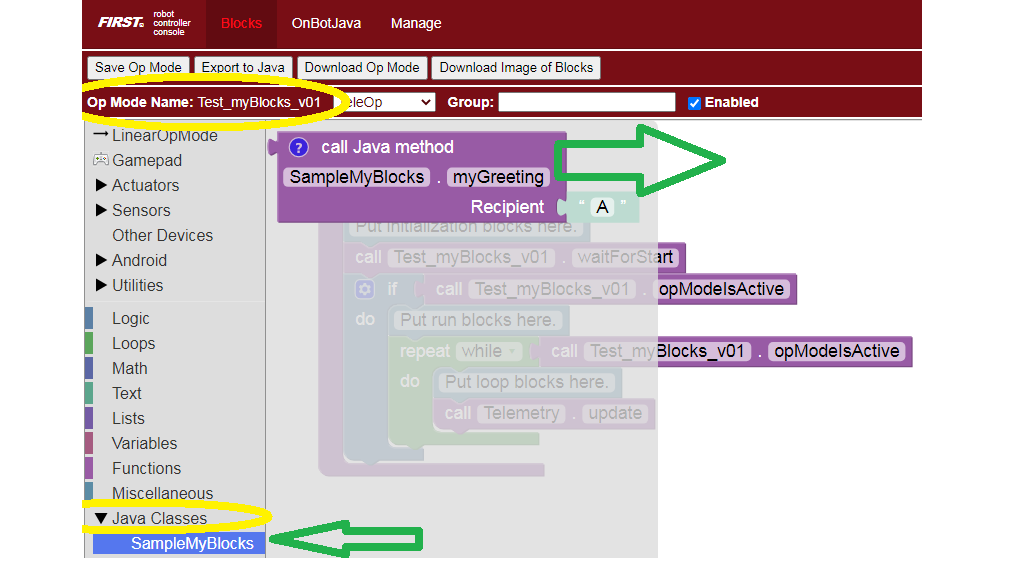
This myBlock has one grey input field or socket, containing the letter A to indicate a String or text input. Type the greeting recipient, World.
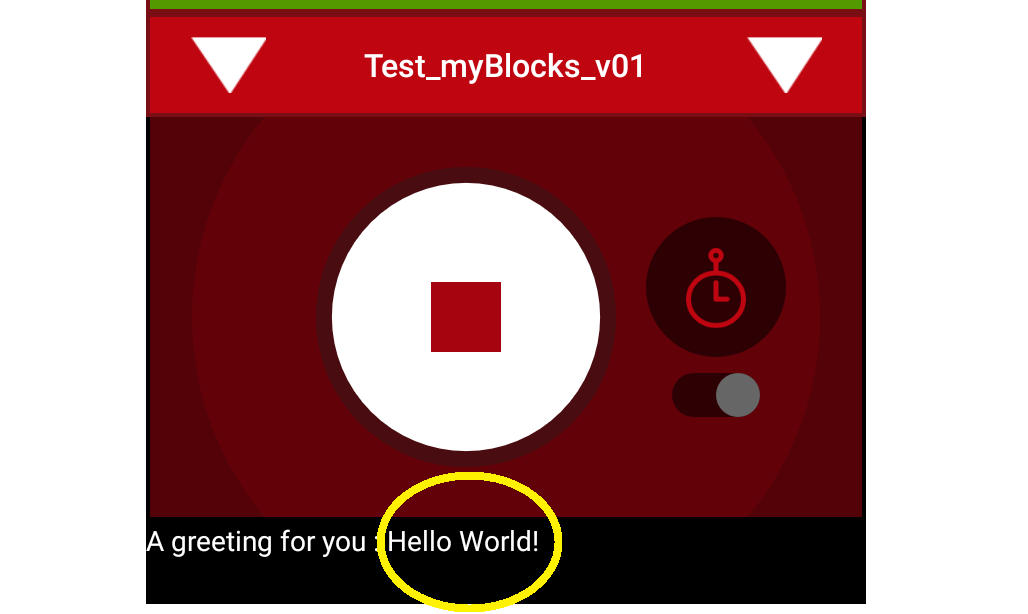
To display the myBlock's String or text output, look under Utilities for the Telemetry menu. Drag out the Telemetry.addData Block that displays text (not numbers).
In the key socket, type A greeting for you. At the text socket, drag and connect your new myBlock. The myBlock's text output will be read and displayed by the text version of the Telemetry.addData Block.

Place these Blocks in the repeat while (loop) section of your OpMode, before Telemetry.update. Click Save OpMode.

On the Driver Station or DS phone, select this OpMode called Test_myBlocks_v01, touch INIT and the Start Arrow. Look at the Driver Station (DS) screen to see the traditional greeting for new programmers.
Congratulations! You are now an OnBotJava programmer and myBlocks creator.
For extra fun: try the Telemetry.speak Block, followed by a 1500 millisecond
.sleepBlock. You can learn more about DS spoken telemetry at this separate tutorial.
This tutorial has three more sections with myBlocks guidelines, followed by five examples for you to re-type in OnBotJava and test in Blocks. Enjoy!
The required annotation @ExportToBlocks has optional fields, which may be listed in any order. These fields allow a myBlock to have a custom comment, tooltip, and parameter labels.
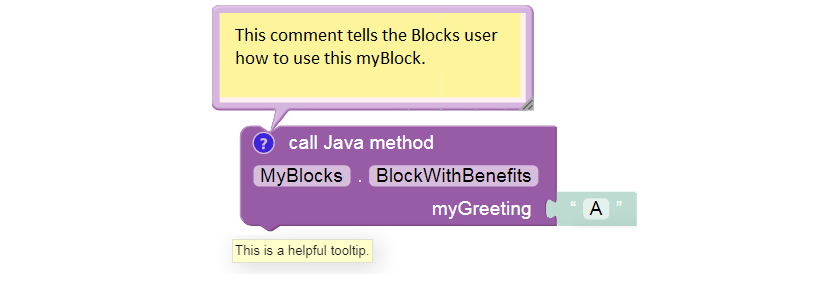
- The comment text appears in a balloon when the Blocks user clicks the blue question-mark icon. Tell the user how to use your myBlock.
- Must be entered on a single line, with no line breaks.
- The blue icon will appear only if a custom comment is specified. The Blocks user can add and remove the blue icon, and can edit its text in the (re-sizeable) balloon.
- A tooltip appears with a mouseover: hovering the mouse cursor over an image or icon. Every Block has a short tooltip to indicate its purpose.
- Must be entered on a single line, with no line breaks.
- If a custom tooltip is not specified, the default tooltip will name the method, its enclosing class, and return type.
- Another tooltip, for the grey input socket (at right), is auto-generated based on parameter type.
- The parameterLabels text appears on the myBlock, each next to its grey input socket.
- Multiple labels are separated by a comma. Line breaks may be used between labels.
- For a single parameter, this also works:
parameterLabels = "sampleParameter".
In the Hello World example, you may have noticed that the parameter label Recipient was not the same as the Java input parameter name greetingRecipient. They don't need to be the same. One is for the Blocks user, the other is for the Java programmer. Just list them in the correct/same order, so their meanings correspond.
In fact you don't need to label every input; a default label will instead show the declared type (e.g. String, boolean, int, double, etc.). In any case each grey socket will contain a sample of the required type (e.g. A, false, 0), with an appropriate tooltip.
If the number of parameter labels does not match the actual number of Java parameters, all custom label will be ignored. Instead the default labels will be displayed.
A myBlock may have up to 21 parameters... not recommended! Keep things simple.
Again, the annotation @ExportToBlocks must appear immediately before each myBlock method, even if not using the optional fields.
Do not type or run the following myBlock example. Its dummy inputs simply illustrate various parameter types. This myBlock does correctly read the robot battery voltage, but FTC Blocks now offers a regular VoltageSensor command in the Sensors menu.
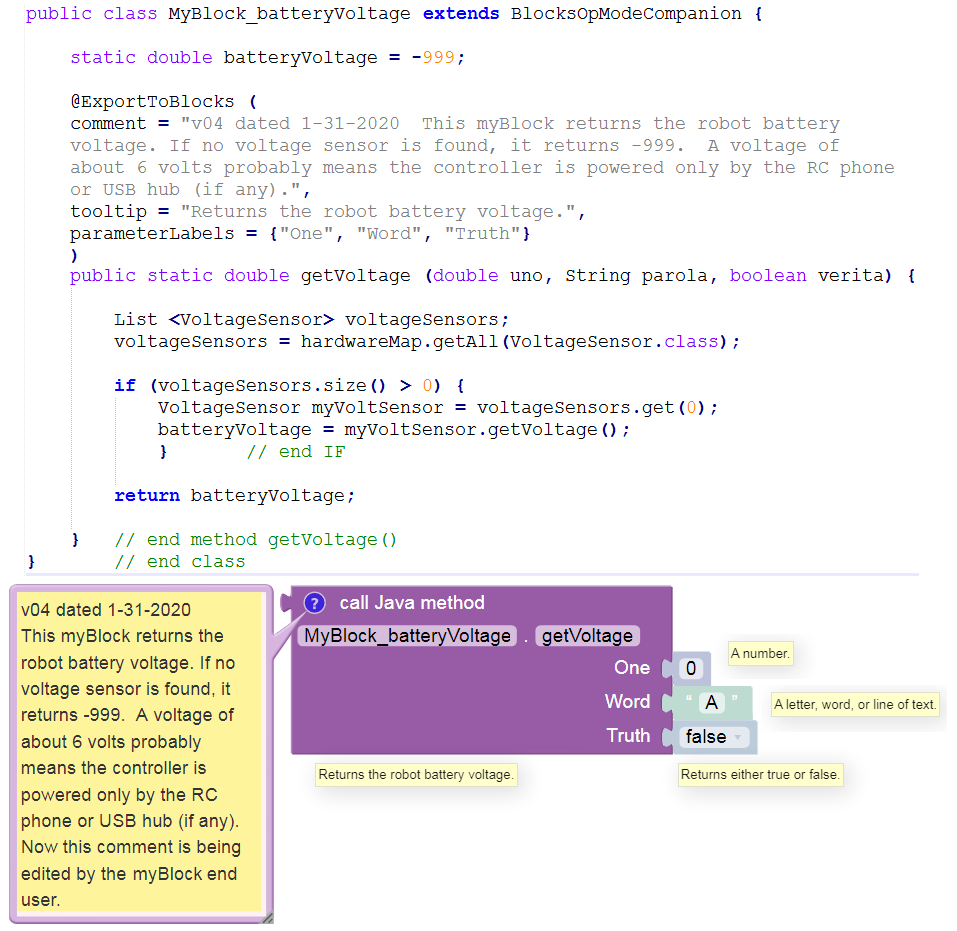
Notice that the Java parameters uno, parola and verita have myBlock labels One, Word and Truth. They are allowed to be different.
The comment field explains this myBlock to the Blocks user, who can edit or delete the comment. Its Java text appears 'rolled over' only for display here; it must be entered as a single line of text.
A myBlock tooltip should be brief. Note: the four tooltips don't all appear at the same time; each appears with a mouseover. One is custom, three are auto-generated based on input type.
Each input socket shows a default value of its parameter type, with a corresponding tooltip. As shown in the method signature, parameter uno is Java type double (a number), parola is type String (text), and verita is type boolean (true or false).
Programming tip: unlike primitive types, Strings must be compared with
Object.equals()rather than==. That's because a text parameter is actually an object or instance of the String class, which has its own methods equivalent to basic Java operators like==,>,<, etc.
Programming tip: In this example, the variable
batteryVoltageis declared and initialized outside the method, and thus could be used by other methods in this class.
Some final notes about parameter types:
- If your myBlock method uses a parameter declared as type
booleanorjava.lang.Boolean, the myBlock's input socket will accept any Block that returns (supplies) a Boolean value. - For method parameters declared as
float,java.lang.Float,double, orjava.lang.Double, the myBlock will accept any input Block that returns a number. - For method parameters declared as
byte,java.lang.Byte,short,java.lang.Short,int,java.lang.Integer,long, orjava.lang.Long, the myBlock will accept any input Block that returns a number and will round that value to the nearest whole number. - If your myBlock method uses a parameter with only one text character, you may use (instead of type
String) typecharorjava.lang.Character. In that case, the myBlock's input socket will accept any Block that returns text and will use only the first character in the text string.
If you edit and re-Build a myBlock's Java code, you might need to replace that myBlock in the Blocks OpMode. It depends on whether you change the myBlock's visible or external features: annotation fields, input parameters or returned outputs.
If your Java change does affect external features, its updated myBlock is available only from the Java Classes menu in Blocks. Any such myBlock already placed in an OpMode is obsolete and may generate a Blocks warning; replace it with the new myBlock. In some cases you may need to re-open the OpMode from the top-level Blocks listing.

If your edit affects only the myBlock's internal processing, it will update automatically after "Build Everything". In that case, it doesn't need to be replaced with a fresh version from the Java Classes menu. In fact, you don't even need to click Save OpMode in the Blocks screen. You can simply re-run the OpMode on the Driver Station, without re-selecting it from the list of OpModes. Just click INIT and Start; the edited myBlock will run. Really! This allows very fast testing of minor/internal changes to the myBlock.
In any case, consider adding versions to your myBlock names, such as myGreeting_v01. Copy and paste before editing, to keep all related myBlock methods in the same Java class. In Blocks, all uniquely named versions will be available in the Java Classes menu, under that single class name.
Keep the class name short and generic, such as MyBlocks, SampleMyBlocks, Team8604MyBlocks, DrivingMyBlocks, etc. It will contain all or many related myBlocks, not just one myBlock per the simple examples above.
In that single class, each myBlock method must appear after its own annotation @ExportToBlocks. That class may contain other methods that are not myBlocks; omit the annotation before any non-myBlock methods. Such methods might be used to initialize variables, or might be (shared) submethods called by one or more myBlocks. An example is shown far below.
This tutorial has covered these basic requirements so far:
- create/store in org.firstinspires.ftc.teamcode folder/package
- class extends BlocksOpModeCompanion
- each myBlock method needs annotation @ExportToBlocks
- method must be public and static (must not be abstract)
- replace myBlocks after external edits
The rest of this tutorial gives examples that you can re-type in OnBotJava and test in Blocks. Try making changes and adding features!
Here's a very simple example to illustrate how a myBlock can access the robot hardware. Here, the Blocks user enters the servo's name as a parameter of the myBlock.

Note: this tutorial intends for you to manually type the Java code above. It's good practice! If you require pre-typed text of this example, click here.
Lines 10-11 must be entered in OBJ as a single line, split here for display only.
Line 15: this method has 3 inputs and no outputs (keyword void).
Line 17 shows how to access hardwareMap, the configured devices list provided from BlocksOpModeCompanion. That single line of Java does this:
- declare (or instantiate) a new object called myServo, of type (class) Servo
- get the properties (methods and variables) of the named servo from hardwareMap
- assign those properties to the new object myServo
Line 19 is a for loop, which you can learn about here or here. It runs the specified servo back and forth, using the specified duration and number of cycles.
Lines 20 and 22: the object myServo uses a method setPosition() from the Servo class.
Lines 21 and 23: the object linearOpMode uses a method sleep() from the class inherited from BlocksOpModeCompanion.
The Blocks user must enter the exact device name from the active configuration. Hardware device names (motors, servos, sensors) are found in the Configure Robot menu on the RC phone, DS phone or Driver Station. Or, it might be easier to retype the name from any Blocks drop-down list containing those device types. For example, a green Servo set .Position Block will display all configured servo names -- make sure the correct configuration was made active before entering the Blocks session.

As an alternate, you could 'hard-code' the servo's name directly into the Java method, instead of the Blocks user entering the servo name as a parameter.
PROs of hard-coding:
- myBlock is simpler
- Blocks user doesn't need to know or enter the servo name
CONs of hard-coding:
- you need to know the exact servo name in advance
- if the name ever changes, your myBlock cannot find the servo
Note: As a programmer, you will constantly face choices like this, with pros and cons. This is part of User Interface (UI) design, a key professional skill and career path.
A different version (gamepad-controlled, fully commented) of the above Java program is provided here. It illustrates using 5 of the 6 objects provided by BlocksOpModeCompanion, including telemetry and the gamepads. This longer example, or the short version above, could be used in an OpMode like this:
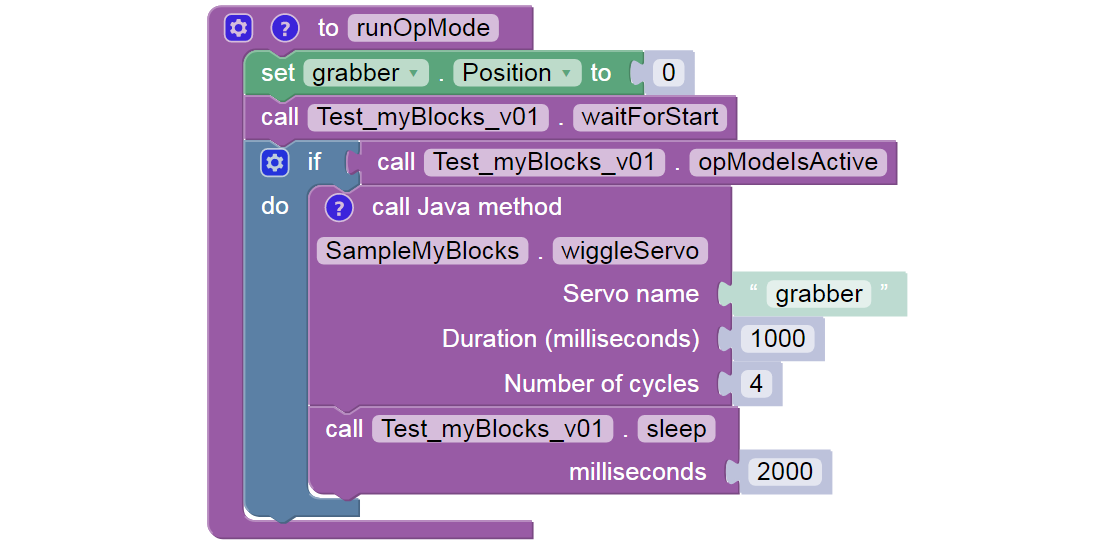
The final .sleep Block allows any telemetry to remain visible on the DS screen, before this sample OpMode ends.
Here is the Java code (method only) for converting an inches of driving target into an encoder counts target. The conversion depends on the drive motors' counts-per-rotation (CPR), and the diameter of the drive wheels. This example assumes 1:1 gear ratio between the motor and wheel.

This method takes three inputs from the Blocks user, and returns one output (of type int or integer) to the regular Block that calls the myBlock.
Programming tip: notice the calculation uses the variable or constant named PI, from the class Math. This holds the fixed numeric value 3.14159.... The import statement for the Math class is generated automatically by OnBotJava (or Android Studio).
Here is an example of typical usage.

Programming tip: notice the
(int)operator at thereturncommand. This converts or casts the countsToDrive variable of typedoubleto typeint, to be compatible with the required return type. Learn more about type casting here or here.
As programmer, you could modify this example in many ways, such as:
- handle a gear ratio between the drive motors and wheels
- the second and third parameters could be 'hard-coded' into the myBlock, if they will never change
- those 2 variables could be initialized in a non-myBlock method and used by multiple myBlock methods in that same Java class
FTC timers offer much more capability than the familiar .sleep Block. Java programmers can learn about timers from this Blocks tutorial; you can easily apply its lessons to Java programs.
When creating myBlocks, be careful when converting or 'packaging' a section of existing Java code into a myBlock method. As a programmer, you must consider where your myBlock might be placed in the OpMode. For example, if the myBlock is placed inside a repeat while loop, all its commands will be repeated many times -- this may or may not be what you intended. Use the annotation comment to tell the Blocks user how your myBlock should be run, including looping (or not).
A particular caution with timers: creating or instantiating a new FTC timer also starts or resets that timer. If a timer is created inside a myBlock that's used in a Blocks repeat loop, that timer will constantly reset and never advance to the intended time limit.
The following example separates the create timer task from the reset timer task.
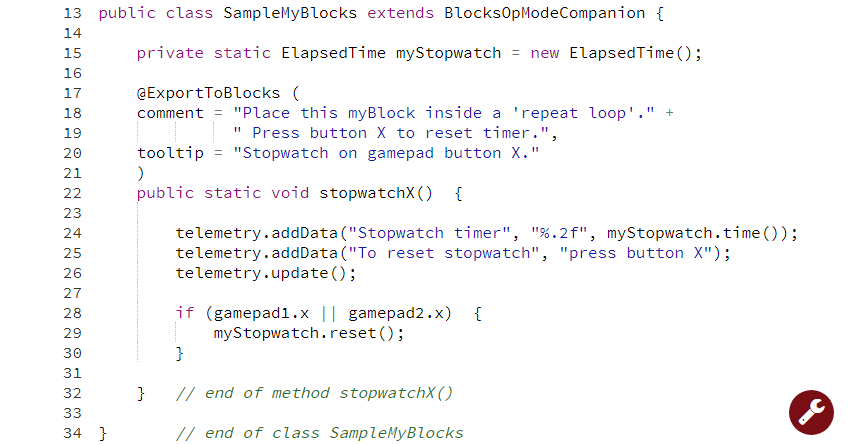
Line 15: this single line of Java does all this:
- declare (or instantiate) an object called myStopwatch, of type (class) ElapsedTime
- the object is private, can be used only in this class SampleMyBlocks
- the object is static, can be used in static methods such as myBlocks
- call the constructor method ElapsedTime() to create a new object with the class methods and variables
- assign those methods and variables to the object myStopwatch
Lines 18-19 must be entered in OBJ as a single line, split here for display only.
Line 22: this method has no inputs (empty parentheses) and no outputs (keyword void). This is why the annotation @ExportToBlocks was missing the parameterLabels field.
In Line 24 the data is displayed using a formatting code, indicated by the percent sign. The .2f will display a numeric value with 2 digits to the right of the decimal point.
Also on Line 24, the object myStopwatch uses a method time() to retrieve that timer's current value in seconds.
Line 28: the double-strokes operator || means "OR". Other operators include && ("AND"), == ("EQUALS"), and != ("NOT EQUAL TO").
Line 29: the object myStopwatch uses a method reset() to start the timer again from zero.
So, what was the danger? A programmer might naturally place Line 15 inside the method, perhaps at Line 23. But that would reset the timer at every cycle of the repeat while loop. The stopwatch would always show zero.
Or, a programmer might use Line 15 to replace Line 29, since they "do the same thing". But the object myStopwatch is needed at Line 24 also, for telemetry. Moving the telemetry to be after Line 29 does not help. If the operator has not yet pressed gamepad button X, the object does not exist and the program will crash.
When you clicked "Build Everything" in OnBotJava, all of the code in your SampleMyBlocks class was processed. That included creating the object myStopwatch, which became available for any method in that class. It was not necessary to declare it inside the myBlock method. In this case, it needed to be outside the method.
Here's the myBlock in a repeat loop, with its comment and tooltip:

Again, the comment field is the only way to communicate with future users of your myBlock. They cannot see your Java code or its Java comments. Keep your myBlocks interface simple, and the instructions clear.
Note: this tutorial intends for you to manually type the Java code above. OnBotJava helps by suggesting some commands as you type, and entering import statements when classes are used. Android Studio helps even more. If you require pre-typed text of this example, click here. The linked copy includes more Java comments, omitted above to focus on the Java commands. Also not shown are the package and import statements.
Your Java class may also contain methods that are not myBlocks. Consider this if you have multiple myBlocks that perform a shared internal process or calculation. This is a good programming practice in general, not specifically related to myBlocks.
To illustrate, consider the Driving Example above. Imagine you want to create myBlocks to support two different robots.
- Robot A has 4-inch drive wheels with AndyMark NeveRest 40 motors.
- Robot B has 3-inch drive wheels with NeveRest Orbital 20 motors.
- You want the myBlocks to be very simple for your Blocks programming teammates.
Your solution:
- One MyBlock per robot.
- Each Blocks user needs to specify only the distance to drive, in inches.
- Each myBlock uses the appropriate wheel size and motor encoder CPR.
- The myBlocks share a 'utility' method to convert distance to encoder counts.

Line 34 shows the shared method that is not a myBlock. Simply omit the annotation @ExportToBlocks. The keyword private means the method can be called only from inside the same class. Use this whenever possible.
Lines 17 and 29 call the shared method. The method calls provide 3 parameters, which do not have the same names as the input parameters of the 'utility' method -- but their types should match.
At line 38, (int) converts, or casts, a decimal number to integer type. This is called type casting. Programmers must pay close attention to compatible data types. For example, a DC motor set .TargetPosition Block should be given an encoder value as a simple integer, not a decimal number.
At line 15 and others, the keyword final indicates a Java constant: a variable that cannot change value. Java constants are traditionally ALL CAPS. Can you find the Math constant in this program?
Here are the Robot A and Robot B myBlocks, each with its comment balloon and tooltip. Very simple, as you wanted!

Note: this tutorial intends for you to manually type the Java code above. If you require pre-typed text of this example, click here. The linked copy includes a proper/full amount of Java commenting, omitted above to focus on the Java commands. Also not shown are the package and import statements.
The current version of regular FTC Blocks (FTC apps 6.1) does not provide read/write access to an external file, other than automatic Log or Match Log file entries. File access is a useful capability, available so far to Java programmers only. Now it can be done with myBlocks!
Here's an example pair of myBlocks. One myBlock writes a numeric value to a specified filename, and a companion myBlock can later read that value from the same file.

The file is stored on the Control Hub or RC phone, in the FIRST/settings folder. It exists separately from the FTC app, OpModes and other FTC files.
Write and read actions can happen in the same OpMode or different OpModes, allowing various scenarios:
-
Autonomous passes information to TeleOp. For example, what was the latest value of a sensor or encoder?
-
A special set-up OpMode allows gamepad input to choose an autonomous strategy and adjust key parameters. The robot could then be idle for a long time, even turned off. When the match begins, the Autonomous OpMode would read those settings and implement the chosen/adjusted actions.
-
A dedicated log file reports key sensor data in a custom format, with optional time-stamps. For program development and debugging, this could be more efficient than working with the large standard logs or Match Logs.
The Java code for this example is available here, with extensive comments that explain some unfamiliar Java commands. The code can be copied and pasted directly into OnBotJava or Android Studio.
Programming tip: Instead of memorizing every possible Java command, programmers often study and modify existing code for a similar task. Unfamiliar commands are explored with an internet search, or at the FTC Javadoc reference, or at the official Oracle Javadoc.
This simple example supports only a single numeric value per filename. Better versions would allow multiple values and data types -- a good programming challenge!
Be careful about placing myBlocks inside loops. Expanding on the current example, your myBlock might read a larger amount of (unchanging) data from a file. If your OpMode needs that data only once, reading the file in a loop needlessly adds cycle time and might increase the risk of a corrupt or interrupted read operation.
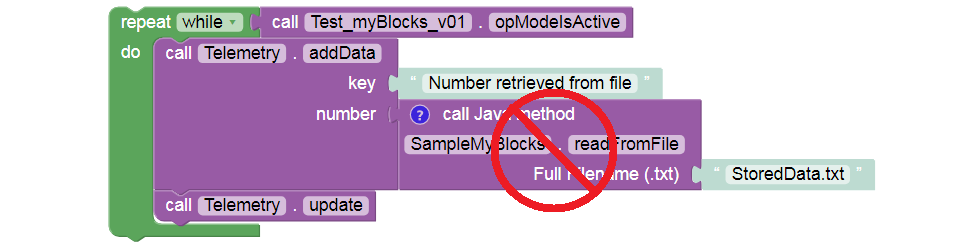
Instead, read the file once and store the relevant data in a variable or array. Then process the variable as needed, inside the loop.

The same suggestion might apply to reading sensors and encoders, if the data are not changing and are needed only once.
MyBlocks offer great potential for creativity and robot capability. Start by programming myBlocks for tasks that an existing group of Blocks can do. Later, add functions that are not available with regular Blocks. Here are some examples of both:
-
Set one or more program variables during INIT, using the gamepad. This can be done with regular Blocks, but a good User Interface (UI) requires multiple long and complex Functions.
-
Create driving actions with multiple sensor controls. For example, gyro-based steering towards a distance goal (ultrasonic or vision target). Or Run_To_Position while following a line. A myBlock can provide Blocks users with controls previously considered too complex.
-
Provide access to third-party libraries such as FTCLib, Road Runner, EasyOpenCV, OpenFTC and many others.
-
One of the above examples controls a servo specified by the Blocks user. This could lead to a family of separate myBlocks to interact with 1 device, 2 devices, etc. Or a generic single myBlock could interact with, say, up to 4 DC motors. The Java method would process only those DC motors with a filled-in parameter name.
-
Control the LED flashlight on the RC phone?
-
Could telemetry.speak have a myBlock equivalent of the Boolean
AndroidTextToSpeech.isSpeaking()?
Do you have more ideas? Do you have a good example to share? Send to [email protected].
Here are some tips for efficiency, from the developer Liz Looney:
-
Limit the number of method calls. Calling a single myBlock that does 5 tasks uses less overhead than calling 5 myBlocks that each do one task.
-
Limit the number of parameters. If your myBlock needs certain information that won't change during the OpMode, use an initialize method that's called once at the start of the OpMode. The initialize method stores that information, to avoid repeatedly passing the same parameter each time the myBlock is called.
-
MyBlocks now provide access to the full range of Java commands in the FTC Software Development Kit (SDK). Blocks programming can now perform tasks previously unavailable to Blocks-only teams.
-
MyBlocks can neatly package previously long or complex Functions in FTC Blocks.
-
MyBlocks programming allows some team members to begin learning and using Java, contributing valuable new features. The other team members can continue learning and working in Blocks, producing the team's official code. Nobody is held back, or left behind.
-
MyBlocks can be created with OnBotJava, which runs on the RC phone or Control Hub. Building and testing are very fast. Many FTC teams do not have easy access to Android Studio, for reasons including school computers that prevent software installation.
-
By developing and sharing myBlocks, experienced FTC teams could help new teams in a more direct way, beyond simply posting a link to their Java library. The FTC community might ultimately benefit from a curated repository for tested, well documented myBlocks. Perhaps the "Blocks Store"?
.
Questions, comments and corrections to [email protected]
.

-
Simple Example
-
More Info
-
Other Examples
-
Summary